
Tutorials
○ 12 min read
Create a blog application with NextJs and MongoDB

Petros Kovatsis
Freelance Software Engineer
March 12, 2024
If you like writing and also love programming, let's create a blog application with NextJs and MongoDB, run it with Docker and start sharing our content.
In this article we will develop a blog web application from scratch by using some great tools available out there. We will be using NextJs to build our web application, Tailwind CSS to add some minor theming, MongoDB to store and fetch articles and last but not least, Docker to build a deployable image and docker compose to run both containers (web application and database) and start serving our content.
At the end of this article, you will find the link to the Github repository. You may fork or download the code and use it as you wish. You may edit it, theme it and deploy it as your own application. Let's waste no more time and start building our awesome blog application, the Vanilla Blog.
Note: It would be great if you already have some experience of the aforementioned tools. If not, that is Okay too, the project is super clean and it is also a good starting point for gaining some extra knowledge and starting to explore those tools by yourself.
For the sake of this tutorial, let's use the KindOfByte.com domain name. I am a big fun of Miles Davis and love his album Kind of Blue. So, I believe you get the point of my inspiration! :)
What we are building
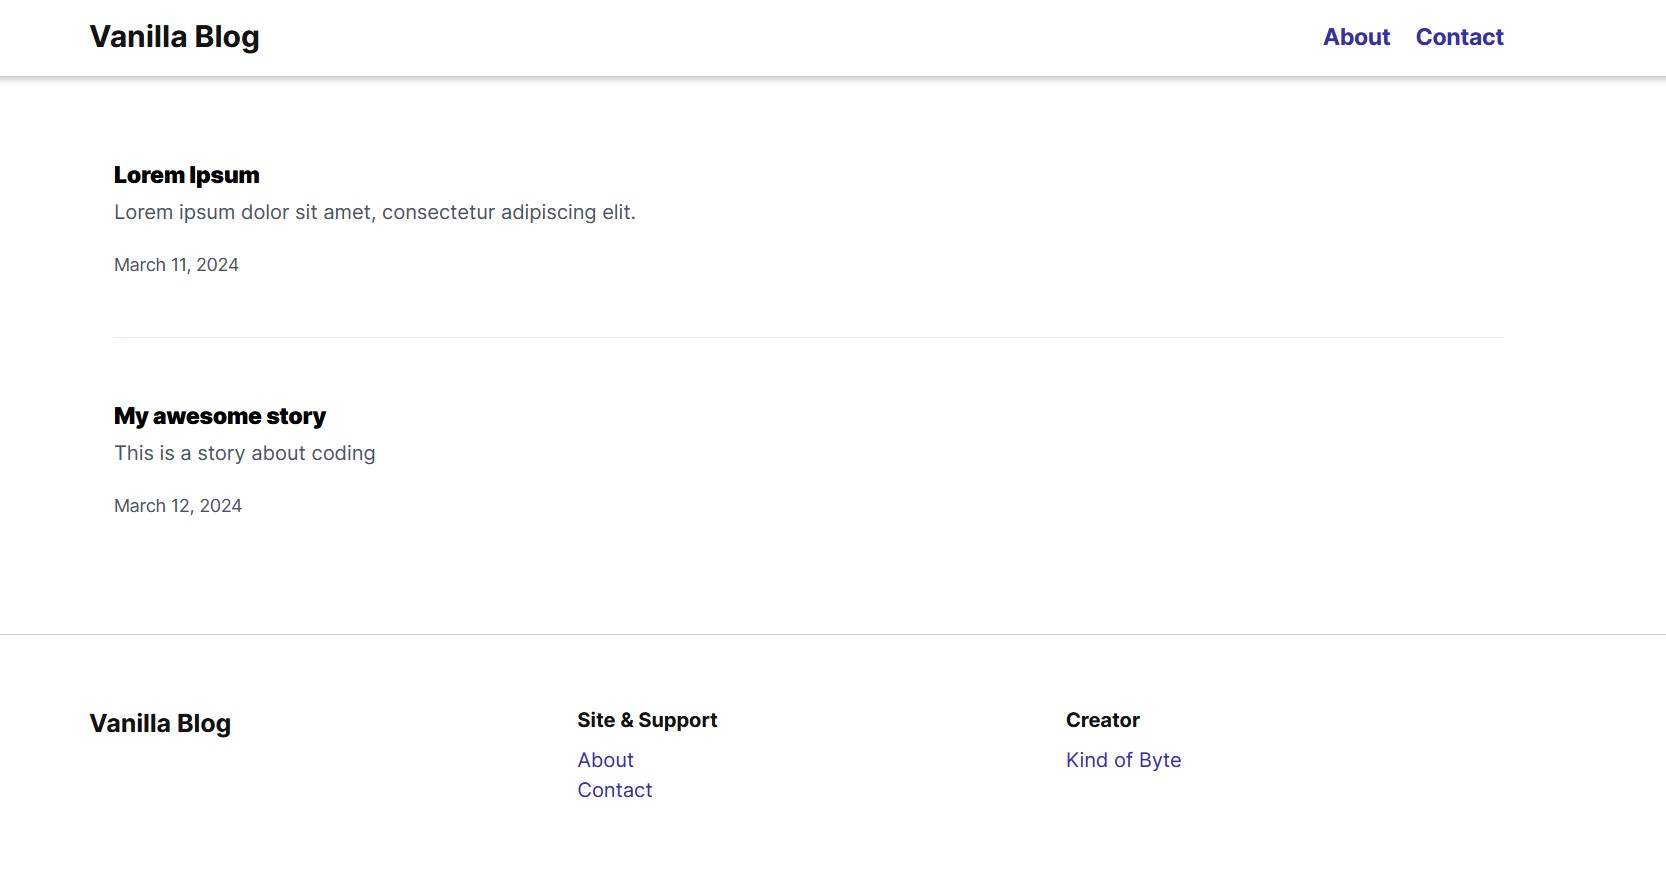
The blog application will consist of 4 subpages. The users will be welcomed by a list of stories and will be available to view and read each one of them. There is also an About page providing more information about our awesome application and a Contact page for those who wish to get in touch with us. You can of course edit, delete or introduce your own pages, it’s all up to you.
Below is the welcome page listing all our saved stories.
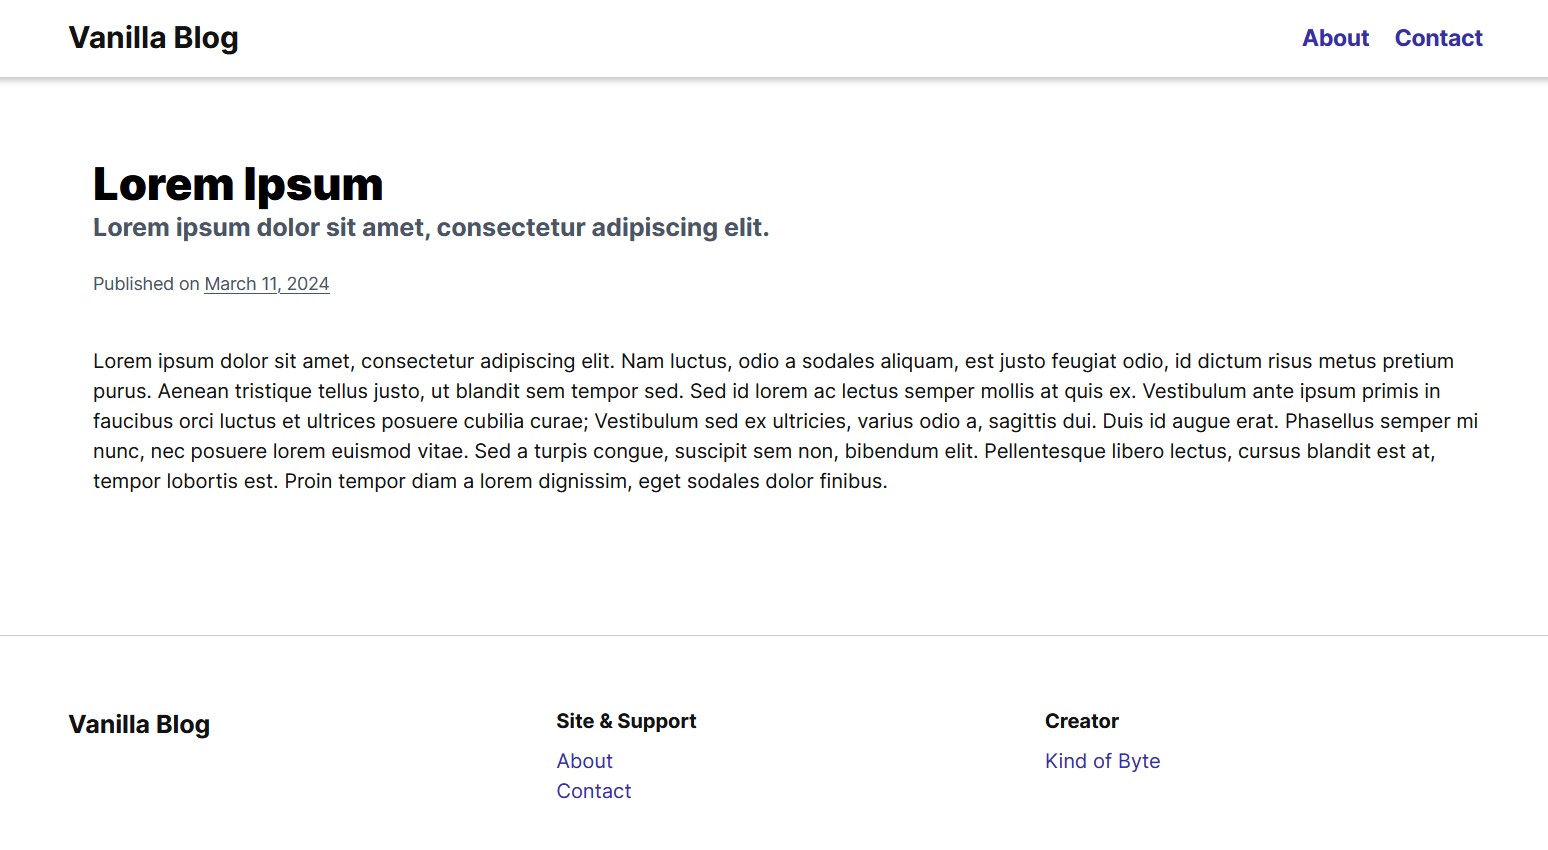
And this is the preview page for a selected story.
The web application
First thing first, we will start by building our web application. We will use the yarn package manager to create a NextJs project, so you must have installed and be able to use NPM (Node package manager) and of course, yarn. If you don't have those tools already installed follow the below instructions to do so.
1. Download and install Node. Verify installation by executing the below code on a command line interface.
> node -v
2. Install yarn by using npm. Execute the below code to install it and verify installation.
> npm install --global yarn
> yarn --version
Great! Now you have yarn ready to use.
3. Let's create our project placeholder. Execute the below code and follow the instructions.
> yarn create next-app
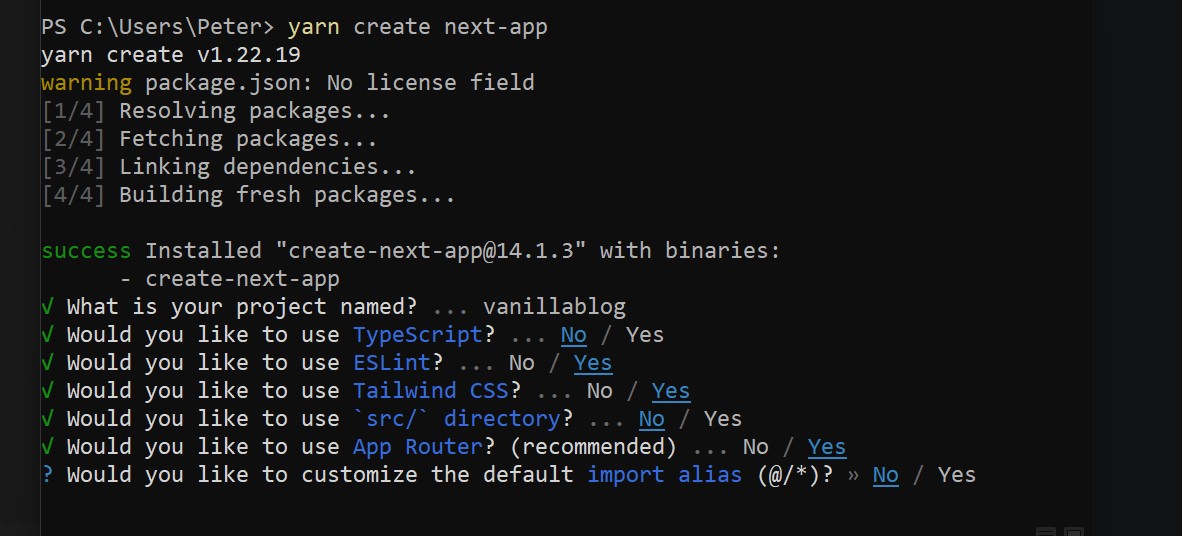
As you can see from the image above, we have created an application and named it vanillablog. We are using Tailwind CSS for look and feel and of course App Router. The App Router is the new feature of NextJs in order to handle views. The previous router was based on Pages, which is still in use but is highly recommended that we switch to the new router. Finally we will not be using TypeScript for this project, just plain old good JavaScript.
Note: We will not go through all the files of the web application, but we will focus on some key aspects that make our application a great place to start developing it further. You can of course download the full code and start exploring it on your own.
The project structure
The main implementation exists in the app/(blog) folder. In there, exist the subpages of the web application. Each subpage is grouped in folders such as the about folder. The App Router handles those folders as routes and tries to locate the page.js file in each one of them. If the file exists, then the folder is considered a path and can be accessed by the web users.
The layout.js file that exists in the app folder is the root layout which contains the HTML meta tags and imports the basic css file, the globals.css. Each route folder may include a layout.js file which extends the root layout and enhances the page functionality, for example an extra layout file is included in the app/(blog)/blog/[title] folder. In the app/components folder you may find common and reusable components imported in various pages.
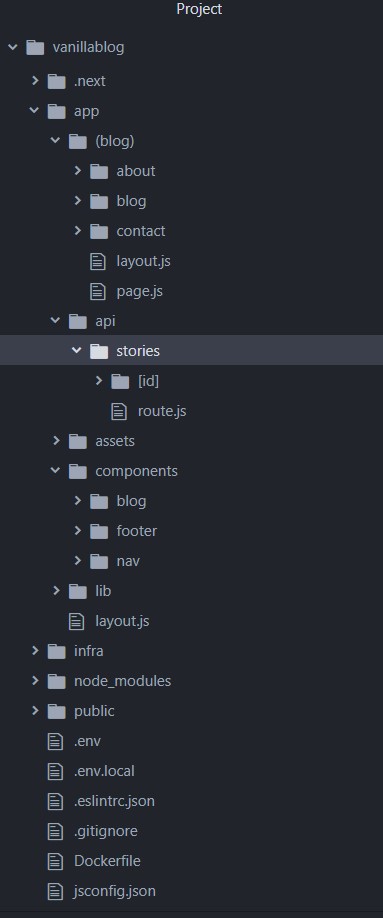
Finally, the app/api folder contains the endpoints that serve our content. Since we don't have a dedicated backend service, we will be using the NextJs router to expose those API endpoints. We will focus more on those routes later in this article.
Key concepts
To start with, we will examine the app/(blog)/page.js file. This is our main page, the page that the users are welcomed with. Since we want to promote our content, this is the page that contains our stories and articles. In order to take advantage of the Server Side Rendering (SSR) we are fetching the stories from the database and rendering them as static content. To do such, we introduce the _getStories function.
const _getStories = async () => {
  const res = await fetch(`${process.env.NEXT_PUBLIC_API_URL}/stories`, { cache: 'no-store' });
  return await res.json();
}
This function is called before the page is rendered and served to the user. This is super critical since we are generating a static page. At first glance this does not look so important but consider web crawlers and of course Google. By generating static content we provide all those rendered textual information to the crawlers and help them understand our page, classify it and of course serve it to the users who search online. To make it more clear, this helps our website's SEO (Search Engine Optimization).
Note: The function above, is fetching data via the API call app/api/stories which is a route in our api folder. The process.env.NEXT_PUBLIC_API_URL is a parameter that exists in the projects .env file. Be careful here, the .env file should not be confused with the app/infra/.env file which we will examine later.
The same goes for the app/(blog)/blog/[title]/page.js file. It fetches a single story by the given id, which in our case is the static title of a story. But what is a static title? It is a good idea to serve URLs like this mywebsite.com/blog/a-story-here. This is easily read, it can be shared, it can be humanly identified and of course it adds in our website's SEO. It seems that crawlers really love those paths because they give them extra information about a page. Moreover it is much more beautiful than, for example, this URL mywebsite.com/blog?id=1123, which says absolutely nothing about what we are going to consume on that page.
To make things better, we introduce an extra layout.js file in the app/(blog)/blog/[title] folder. This layout file extends the parent layout and overrides the default HTML meta tags.
export async function generateMetadata({ params, searchParams }, parent) {
  const story = await fetch(`${process.env.NEXT_PUBLIC_API_URL}/stories/${params.title}`, { cache: 'no-store' }).then((res) => res.json());

  return {
    title: `${story.title} - Kind of Byte`,
    description: story.subtitle,
  }
}
What we achieve here is some extra support for the website's SEO (It seems that blogs are all about SEO). We set the page title and description to be the article's title and description. That way, it is more clear for bots to read and evaluate our web page. The more relevant the page’s title is with the content, the more chance there is for the page to be included in the search results.
The API endpoints
In most applications, there will be an API gateway which forwards the API calls to backend services. Since our implementation is a small application, we may use the NextJs routing mechanism to expose our own APIs. The backend, as we formally called it, is the code part that handles the main business logic of an application. It is also responsible for fetching and storing data to repositories. In our case, the app/api folder will include the endpoints to achieve that functionality.
We will create two endpoints, the app/api/stories/route.js and the app/api/stories/[id]/route.js. The App Router will search for that route.js file in those folders. If such a file exists, just like the pages mentioned above, it makes that path available. Since this path is a route.js file we may add some API functionality, meaning our application listens to those paths and instead of serving a page, it may respond, for example with Json formatted data. On the route.js file, we connect to the MongoDB database by using the app/lib/MongoConnet.js helper file.
export async function GET(request) {
	const db = await connect("blog");
	const projection = { _id: 0, title: 1, subtitle: 1, metadata: 1 };
	const stories = await db.collection("stories").find({}).project(projection).toArray();

	return Response.json(stories);
}
The code above connects to the blog database and fetches stories from the stories collection. It restricts the response to a subset of the story's data - we don't need to include here the main body of a story since it would make our response really big - and finally returns the stories in a Json response. More on MongoDB later in the article.
In order to fetch a single story from the database, we use the app/api/stories/[id]/route.js file. Same as above, this is an endpoint which returns a single story by using its static title.
export async function GET(request, { params }) {
  const db = await connect("blog");
  const story = await db.collection("stories").findOne({ "metadata.staticTitle": params.id });

  return Response.json(story);
}
MongoDB With Docker
Every dynamic application needs a database to store and fetch data from. For our blog application we will use MongoDB, which is a document oriented database. In short it means that it stores data in Json formatted documents. MongoDB is not like other relational databases such as MySQL or PostgreSQL, it is a NoSQL database which provides scalability and high performance to name a few advantages. I highly recommend checking more about MongoDB on their website.
For our blog application we need to create a database named blog and a collection named stories. MongoDB does not support tables, it allows us to use a more versatile way of saving data in documents without a predefined schema. Each document is a collection of keys and values, not all documents must contain all keys. It is so free that unburdens you from the schema creation and of course extension is made easy. That's not to say that MongoDB is a one-size-fits-all solution, there are cons as well and the choice of the database for each application is a matter of extended investigation. In our case though, MongoDB works perfectly!
We will fast forward a little bit now to the infra/docker-compose.yml file. We will focus more on Docker in the next section. For our implementation we will use a docker image for the MongoDB instance already publicly available.
version: "3.8"
services:
  mongodb:
    image: mongo:7.0.5
    restart: always
    ports:
      - "27017:27017"
    volumes:
      - ${MONGO_DIR_PATH}:/data/db
    networks:
      - vanilla_blog_net
      ...
The configuration above tells exactly what we will be using. We will use version 7.0.5 of MongoDB and since we want all the data not to be saved in the container itself, we map a directory from our host machine to MongoDB's default storage directory. That way, no data will be lost if the container is destroyed plus we may transfer that data easily to another machine if that is the case. Finally we expose the default port 27017 to the host machine so that we can connect via a user interface to manage our MongoDB instance.
Infrastructure and Docker
We are finally approaching the end. We will now go through the way we can deploy our application, either locally or on a production server. To achieve that, there is no better way than using Docker. I truly believe this is not the first time you are hearing about Docker! For those of you that are not familiar with (I strongly recommend though to spend some time on learning about Docker), Docker is a platform that enables you to build and package your software in images. Those images can be uploaded into repositories, fetched by the docker engine installed in your production or development machines and of course run. Running images are instances called containers. This is Docker in one line, of course there is much more than that, I hope that I somehow lured you to go and check more online.
The Vanilla Blog application consists of two services, the MongoDB service and the Web Application, so we will need two Docker images that will result in two running containers. So simple. It would be better though to group those images and not run them separately. To achieve that we will use docker compose. For you developing on Windows, docker compose comes built in with Docker Desktop, for Linux users you will need to install docker compose apart from Docker itself. This is a great link of how you can install docker in Linux systems - choose your operating system from the drop down menu - and a second one for installing docker compose, both provided by DigitalOcean.
Now that you have the Docker service up and running, let's examine the infra/docker-compose.yml file as located in the infra folder.
version: "3.8"
services:
  mongodb:
    image: mongo:7.0.5
    restart: always
    ports:
      - "27017:27017"
    volumes:
      - ${MONGO_DIR_PATH}:/data/db
    networks:
      - vanilla_blog_net
  vanillablog:
    image: kindofbyte/vanillablog:0.1.0
    restart: always
    ports:
      - "3000:3000"
    depends_on:
      - mongodb
    networks:
      - vanilla_blog_net
networks:
  vanilla_blog_net:
    driver: bridge
Well, the first service is the MongoDB instance we already mentioned in the previous chapter. What's new here is the vanillablog service, which will run by using the kindofbyte/vanillablog:0.1.0 image. That image is not public, nor does it exist in some repository, we will build it on our own. To do so, the Dockerfile exists in the root of our project. This file includes directives for docker of how it should build our image. Spend some time understanding that file, it is created on stages so that we can reduce the size of the image.
To build the image execute the below code in a command line interface from the root of the project.
> docker build -t kindofbyte/vanillablog:0.1.0 .
The command above will create the appropriate docker image. It may take some time to complete, it depends on your machine power and network connection.
The .env file
In order to keep the docker compose file clean, we introduce the infra/.env file. It is located in the same place with the docker-compose.yml file (It can be located in any reachable place in our machine though). In there we define parameters that may be used in the docker compose file. In our case, the only parameter is the MONGO_DIR_PATH with value /path/to/mongodata. Yes, you guessed it right! You should create a folder in your computer that will hold all the MongoDB data and you should replace the path in the .env file with your own folder. Now check back the docker compose file above, there is the ${MONGO_DIR_PATH} parameter. It should make more sense now, right? It is actually the value provided by the .env file.
Run the application
First let's pull all the public images for our application, in our case just the MongoDB image.
> docker compose pull
Now it's time to run our application. Navigate to the infra folder and execute the below code.
> docker compose up -d
The command above will start the two containers and will expose both ports 27017 for MongoDB and port 3000 for our web application. The last one is the port we will use to explore our blog application, just type on your browser http://localhost:3000. If everything went as planned, then you should be able to view your application. Navigate to the about and contact page. Add stories in MongoDB and refresh the page, they will appear in the list. Select stories to read and check the titles on the tab, the URLs created by the static titles etc.
If you wish to stop the containers you may execute the below command.
> docker compose down -v
Add stories in database
Now that our MongoDB instance is running, we may connect and add stories for our blog. To do that we will use the MongoDBCompass GUI which is provided free by MongoDB. Install and execute the MongoDBCompass
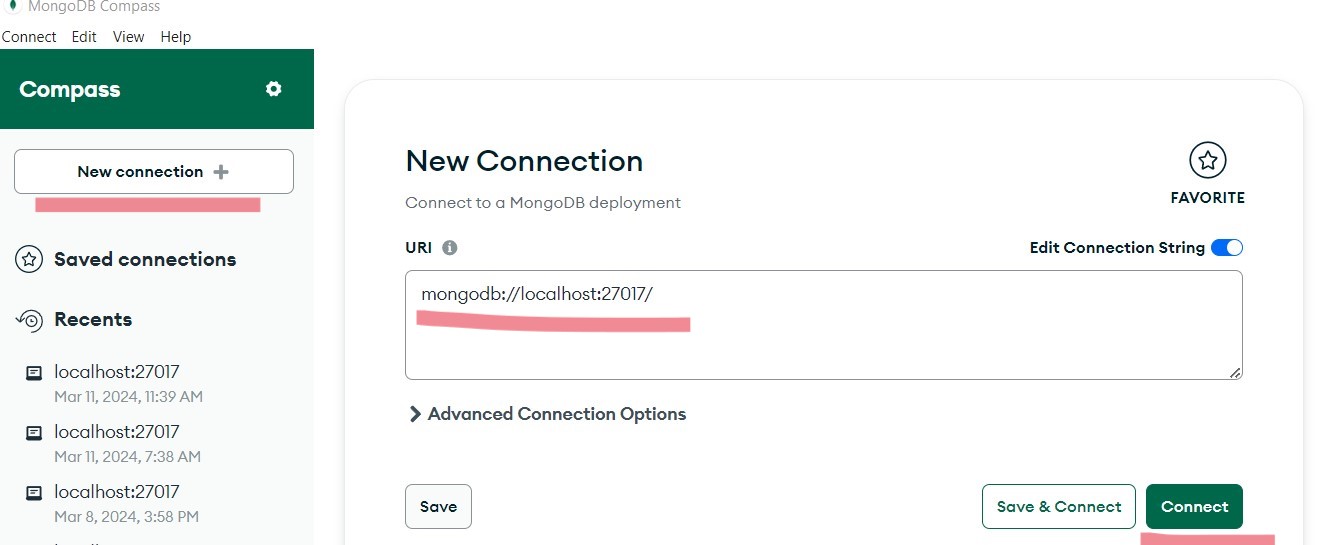
Click New Connection and set the URI to mongodb://localhost:27017, then click connect. Congratulations! You should be in your MongoDB instance.
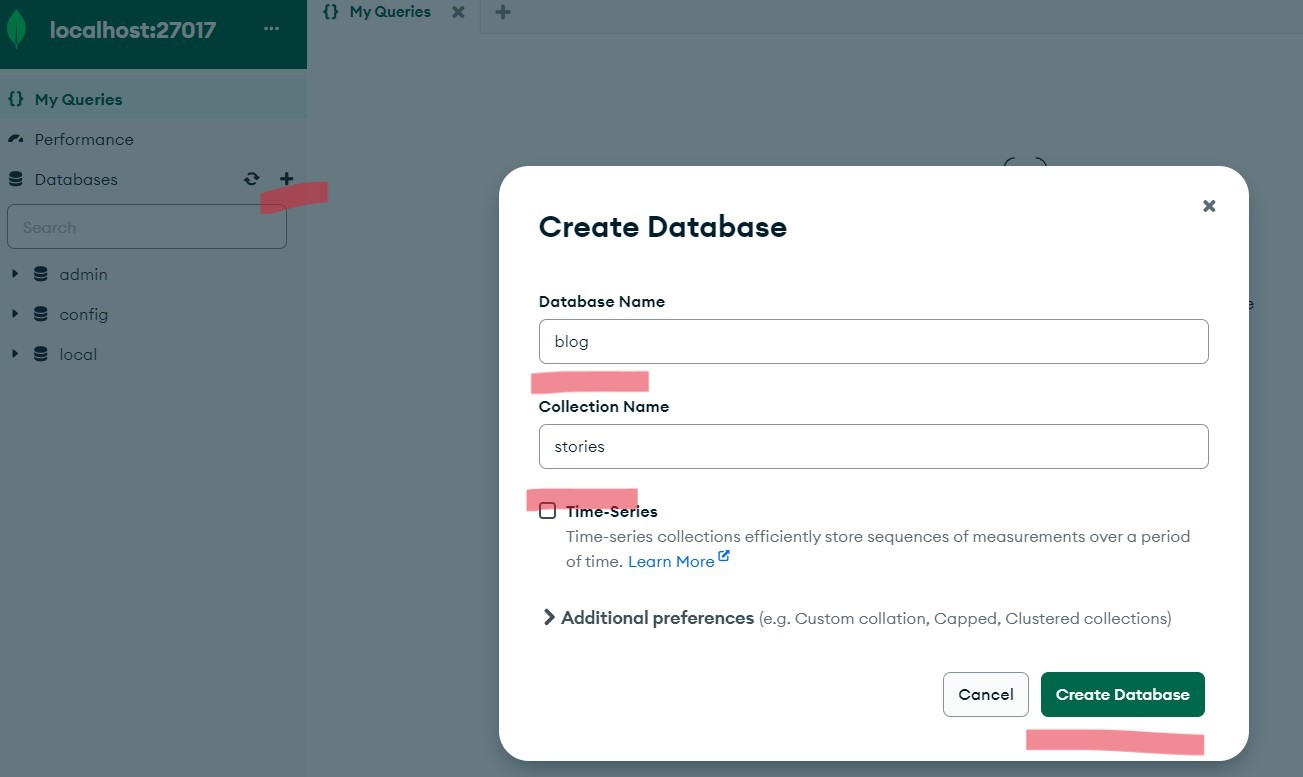
Let's now create a database and a collection. Click the plus sign next to the database, on the popup form use blog for the database name and stories for collection. Finally hit Create Database.
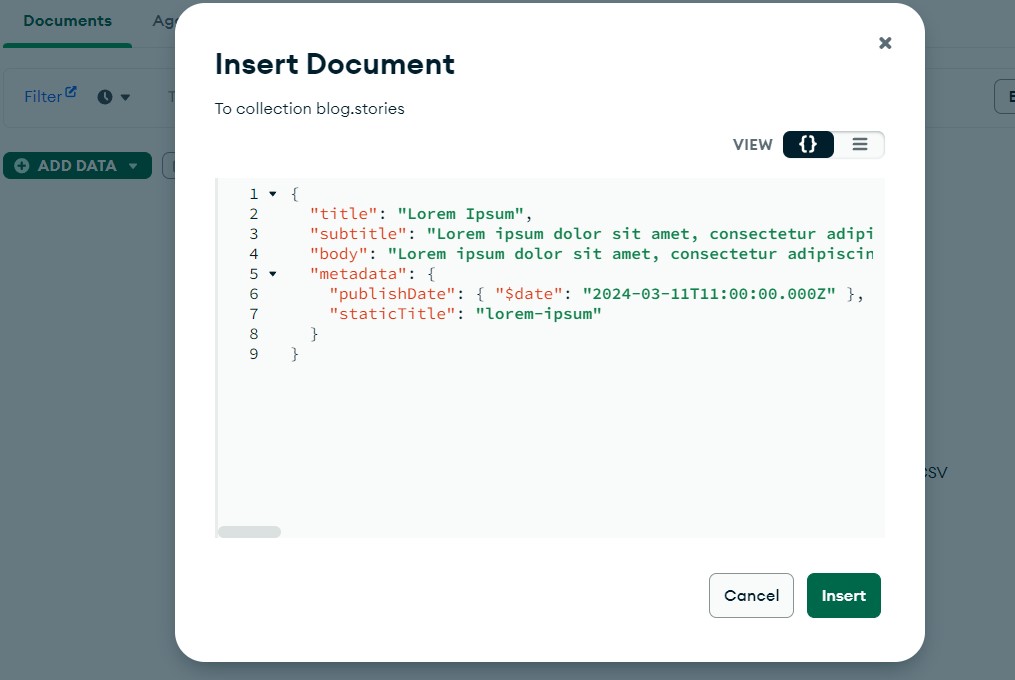
Great, now let's add an article. It is a good idea to keep a similar schema for your documents, remember this is not strictly defined so you have to be careful, or else the documents returned to the blog application will not be parsed correctly. To help you with that, there is a template which we will use to create a record in the database. Go to the app/infra folder and find the story_template.json file, copy its content and navigate again to the MongoDBCompass GUI. Click the ADD DATA button, choose Insert document and paste the content of the template file in the popup. Finally hit Insert, your document should now be saved successfully.
Now go again to your blog application and hit refresh on the browser, your story must be now visible! Use that template and create more stories, follow this process to populate your database. All done!
Conclusion
That's the end of this article. You may fork or download the source code from Github here. If you found this article insightful, consider sharing it with your network, It's always nice sharing things!
Until next time, enjoy coding!
Cheers!